How To: 10 Troubleshooting Steps to Fix Smart Lock & Trusted Places on Any Android Device
When it works, Android's Smart Lock feature is incredible. There's no need to enter your PIN when your phone "knows" it's in your hands — just unlock and go. But Smart Lock, particularly its Trusted Places feature, can be finicky sometimes.Most of Smart Lock's features are rock-solid. Trusted Face, Trusted Devices, On-Body Detection, and Voice Match almost never fail to work, but the most handy Smart Lock feature has the most problems. Trusted Places should keep your phone unlocked when you're at home, but many users are complaining that it doesn't.The troubleshooting steps below are escalating — in other words, you should start with the first one, try Smart Lock again and see if Trusted Places is fixed, then only proceed to the next step if it isn't. Each step is progressively more involved, but they all assume you've tried the previous steps, so make sure to follow them order.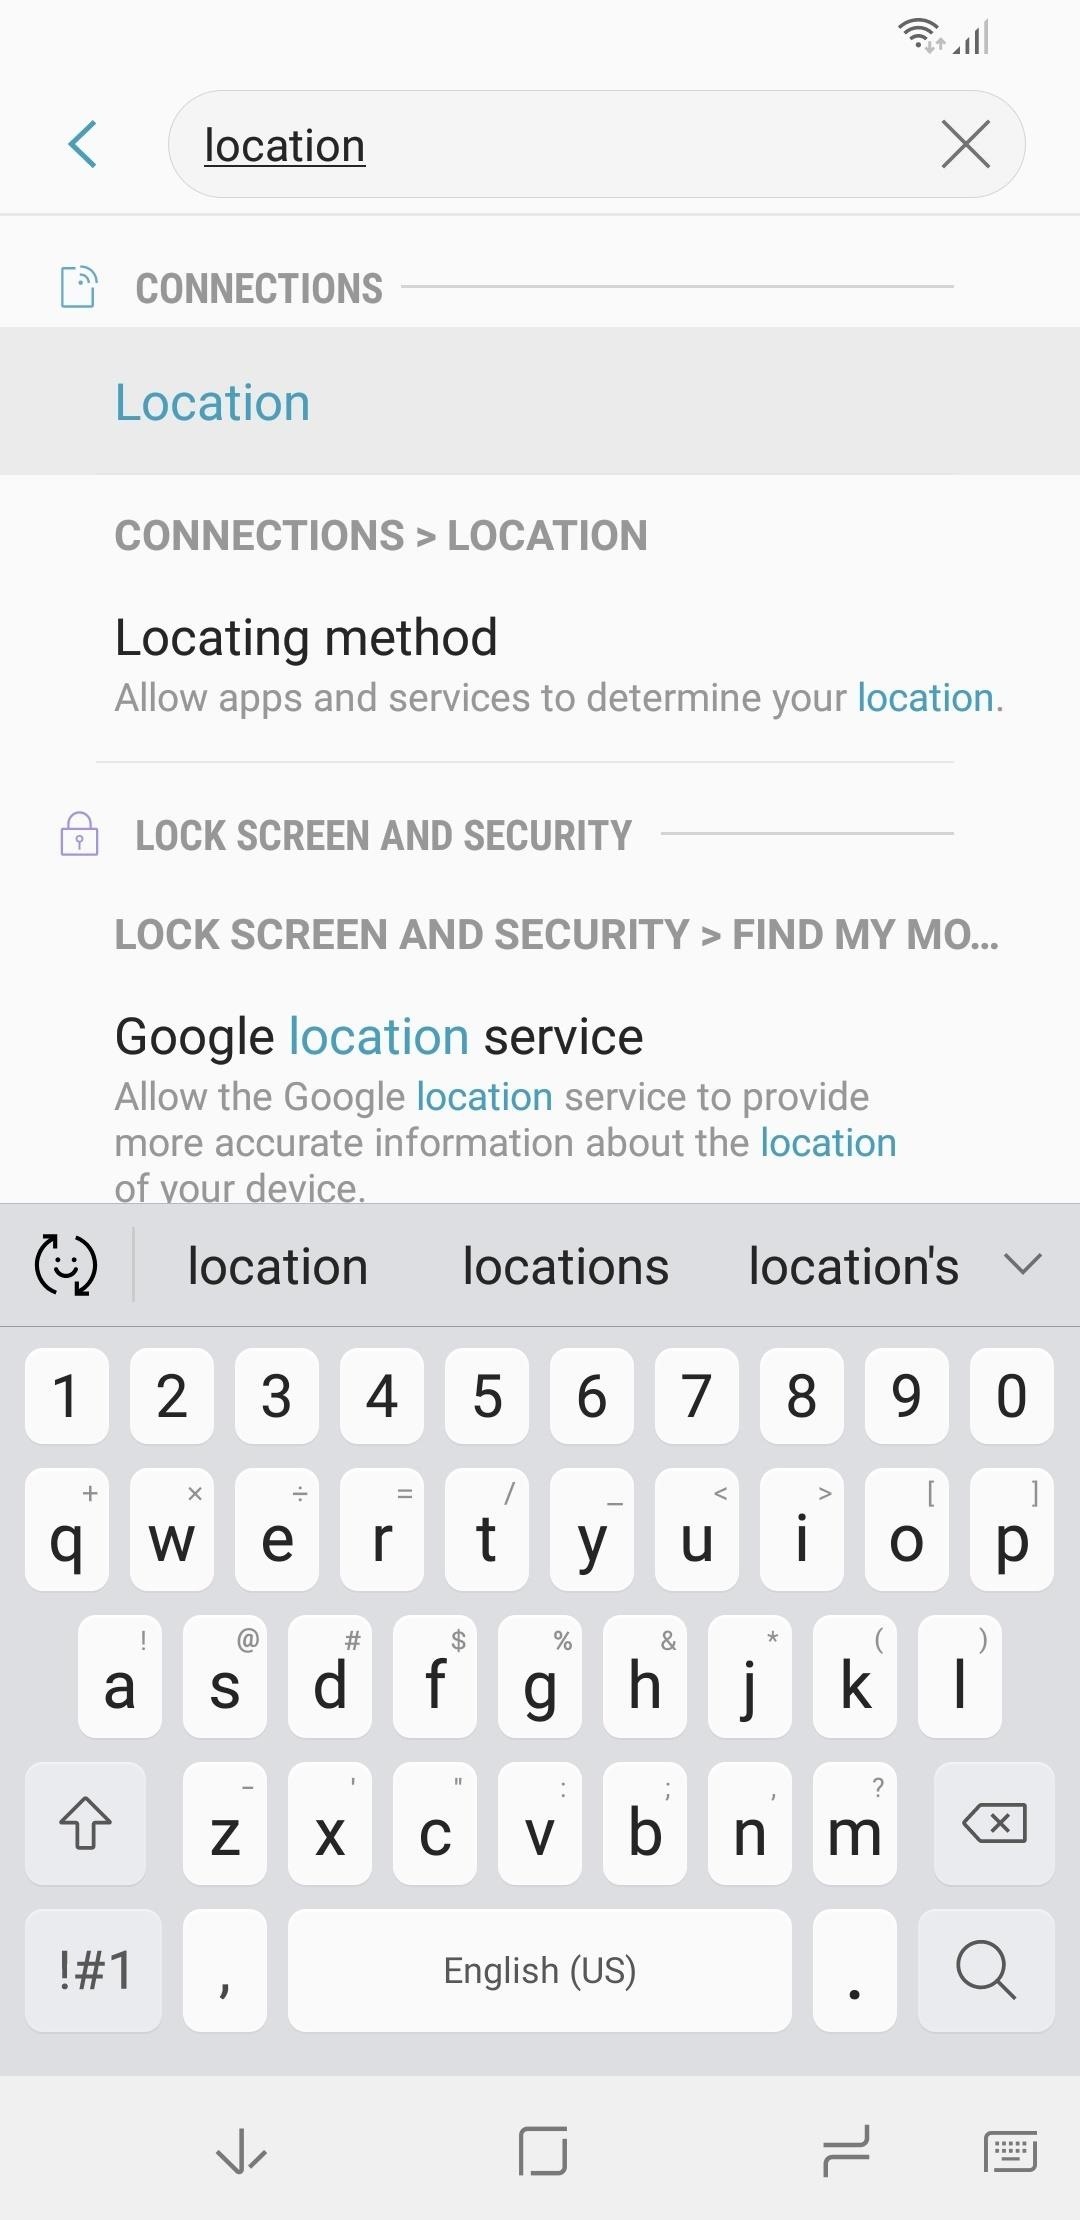
Step 1: Make Sure GPS Is OnThe first step is the simplest: Make sure you have GPS enabled. Other location reporting methods aren't as precise as your phone's actual GPS sensor, and Trusted Places only has a radius of roughly 50 meters, so your phone's reported location needs to be fairly accurate for Trusted Places to work.You can enable GPS by going to your phone's main Settings menu. From there, the exact location may vary depending on your device, so use the field at the top of the main Settings page to search for "Location." Once in the Location menu, select "Location Method" or "Locating Method," then choose "High Accuracy" to ensure GPS is enabled.
Step 2: Make Sure Your Location Is UpdatedThere's a chance that your phone simply hasn't updated its location status in a while. If this is the case, Smart Lock will stop working, as Trusted Places needs a fairly recent location report before it will unlock your phone.So to get lock on your location, open Google Maps and tap the compass icon near the bottom-right corner. When the screen zooms over your current location (the blue dot in Google Maps), your phone will have an updated location report.
Step 3: Disable Other Devices Under Google Location ReportingIf you have more than one Android device, or if you've recently changed phones, location data from the other device could be interfering with Trusted Places.To fix this, head to Settings –> Google, then scroll down and select "Location." From there, choose "Google Location History" (you may have to tap "Advanced" before you see this option), then make sure only your current device is enabled.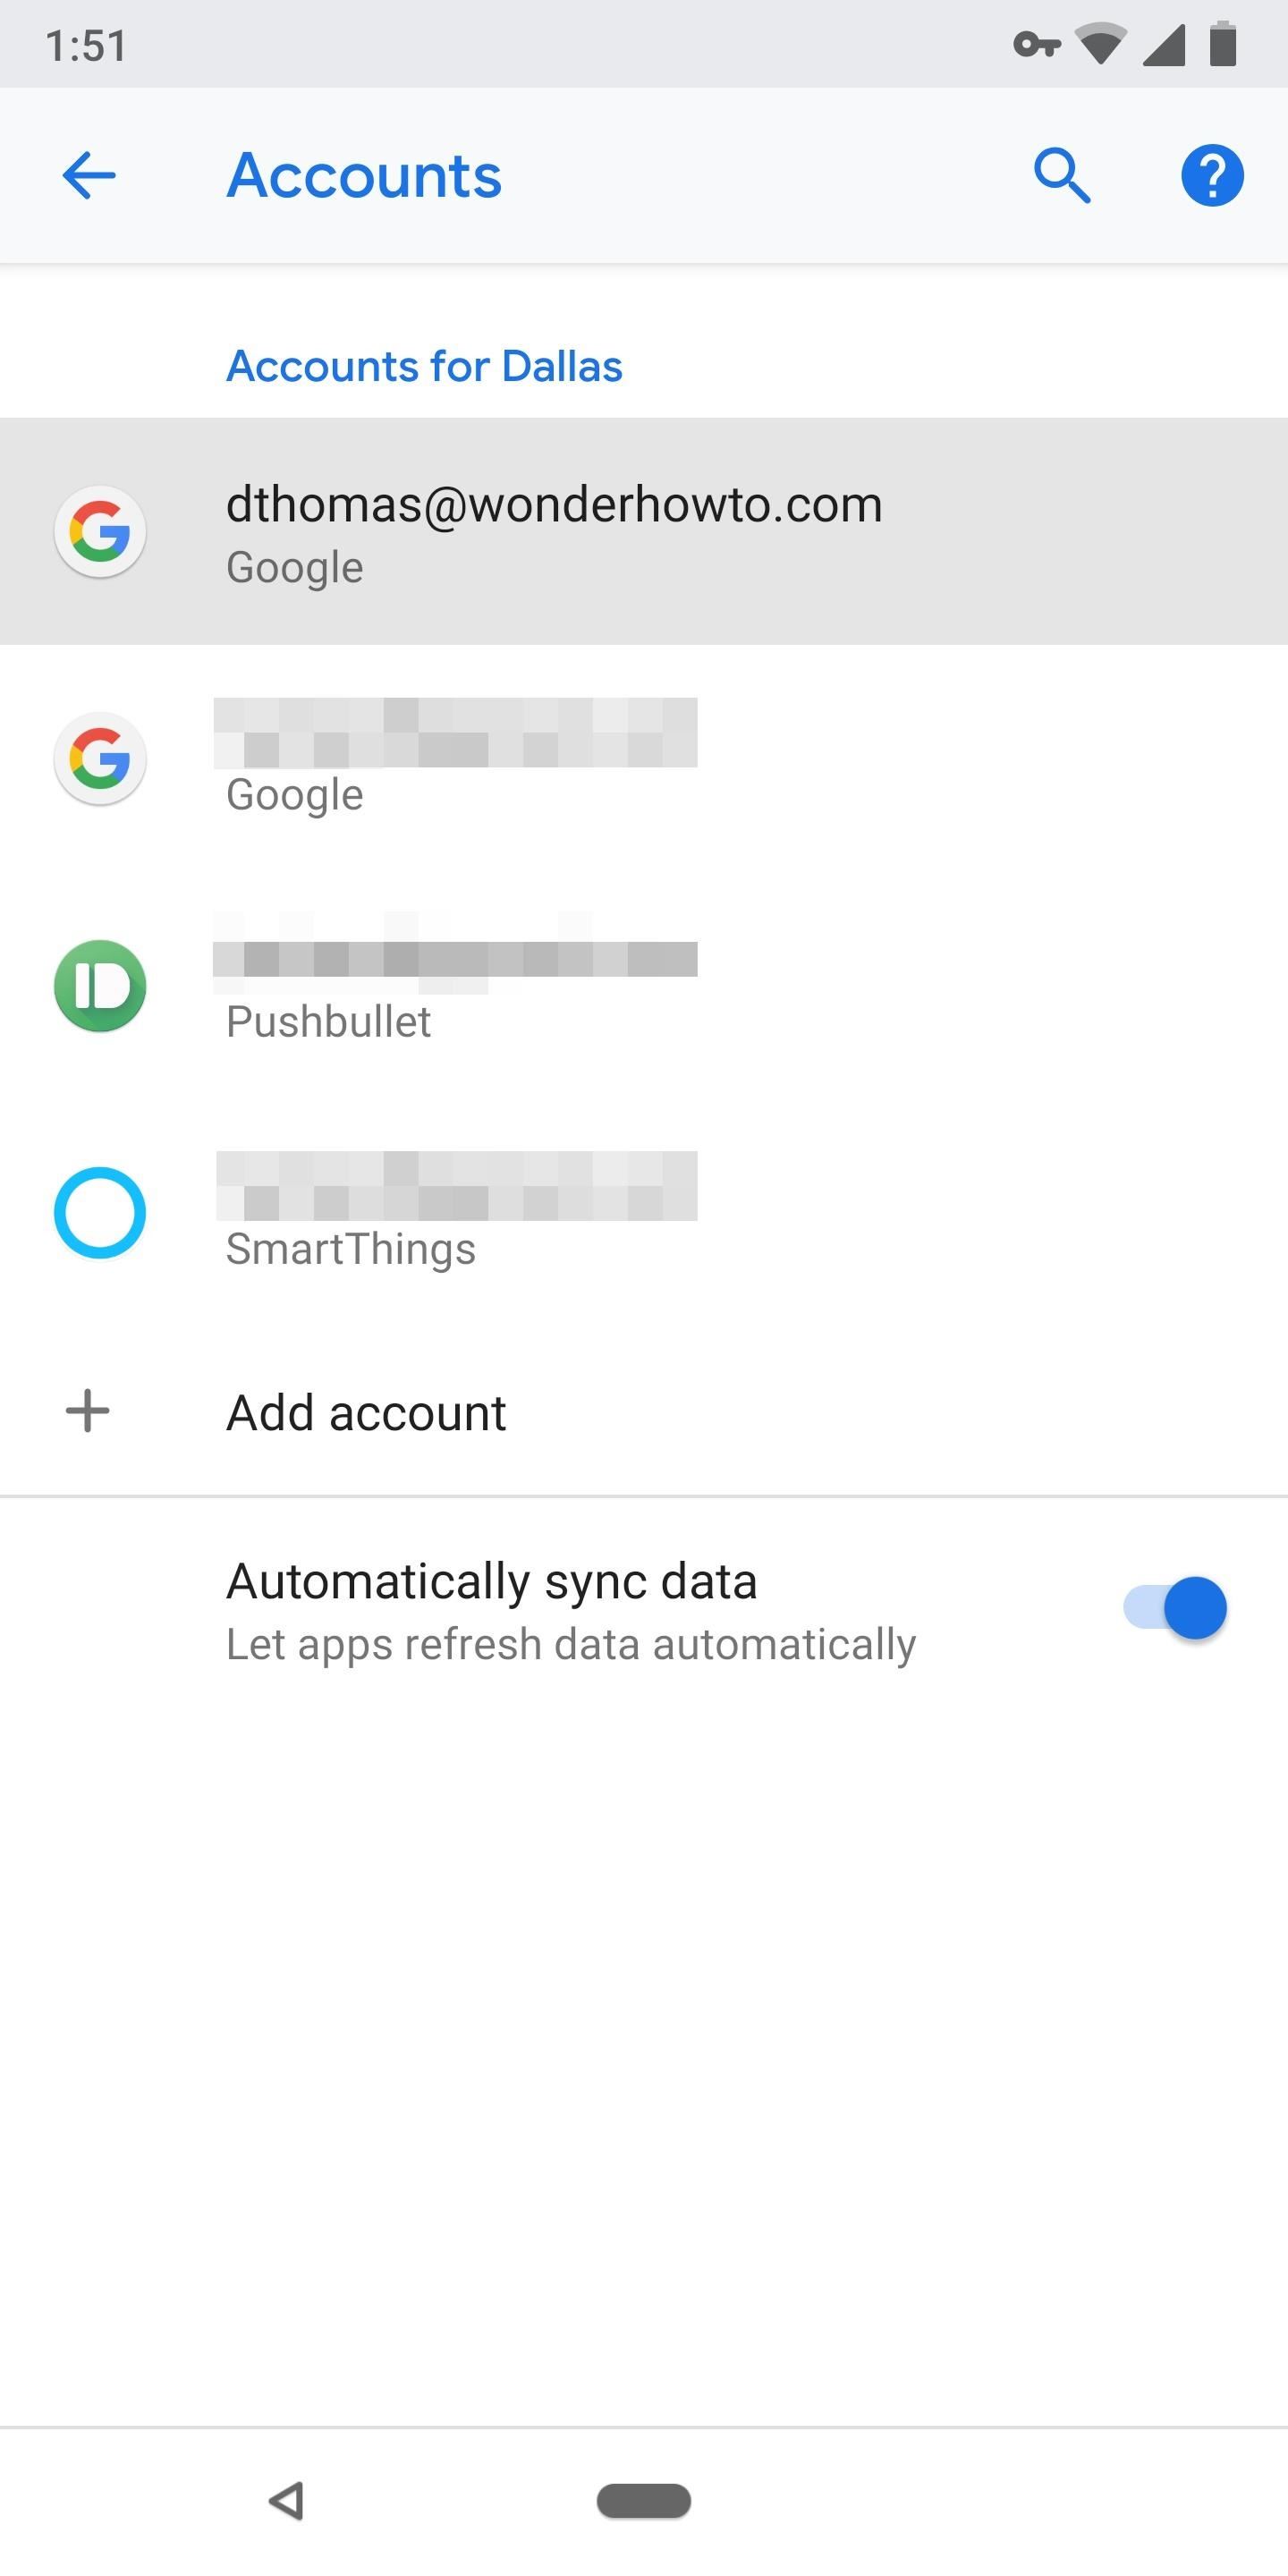
Step 4: Detach Other Google Accounts on the DeviceIn the same vein as Step 3 above, Trusted Places can stop working if the feature is pulling data from a different Google account, in addition to or instead of your primary account.Smart Lock doesn't let you choose which account to use with its features, so if you're signed in with multiple Google accounts on the same phone, it could be pulling location data from the wrong account. There's also the wrinkle of G Suite accounts or "Google Apps" accounts — many of these will outright disallow Smart Lock features, depending on your account administrator's settings.The only course of action here is to remove all additional Google accounts from your phone. Head to Settings –> Accounts, then select any non-primary Google account. Tap "Remove account" on the next screen, then confirm your choice on the prompt. Repeat this step for any other non-primary Google accounts.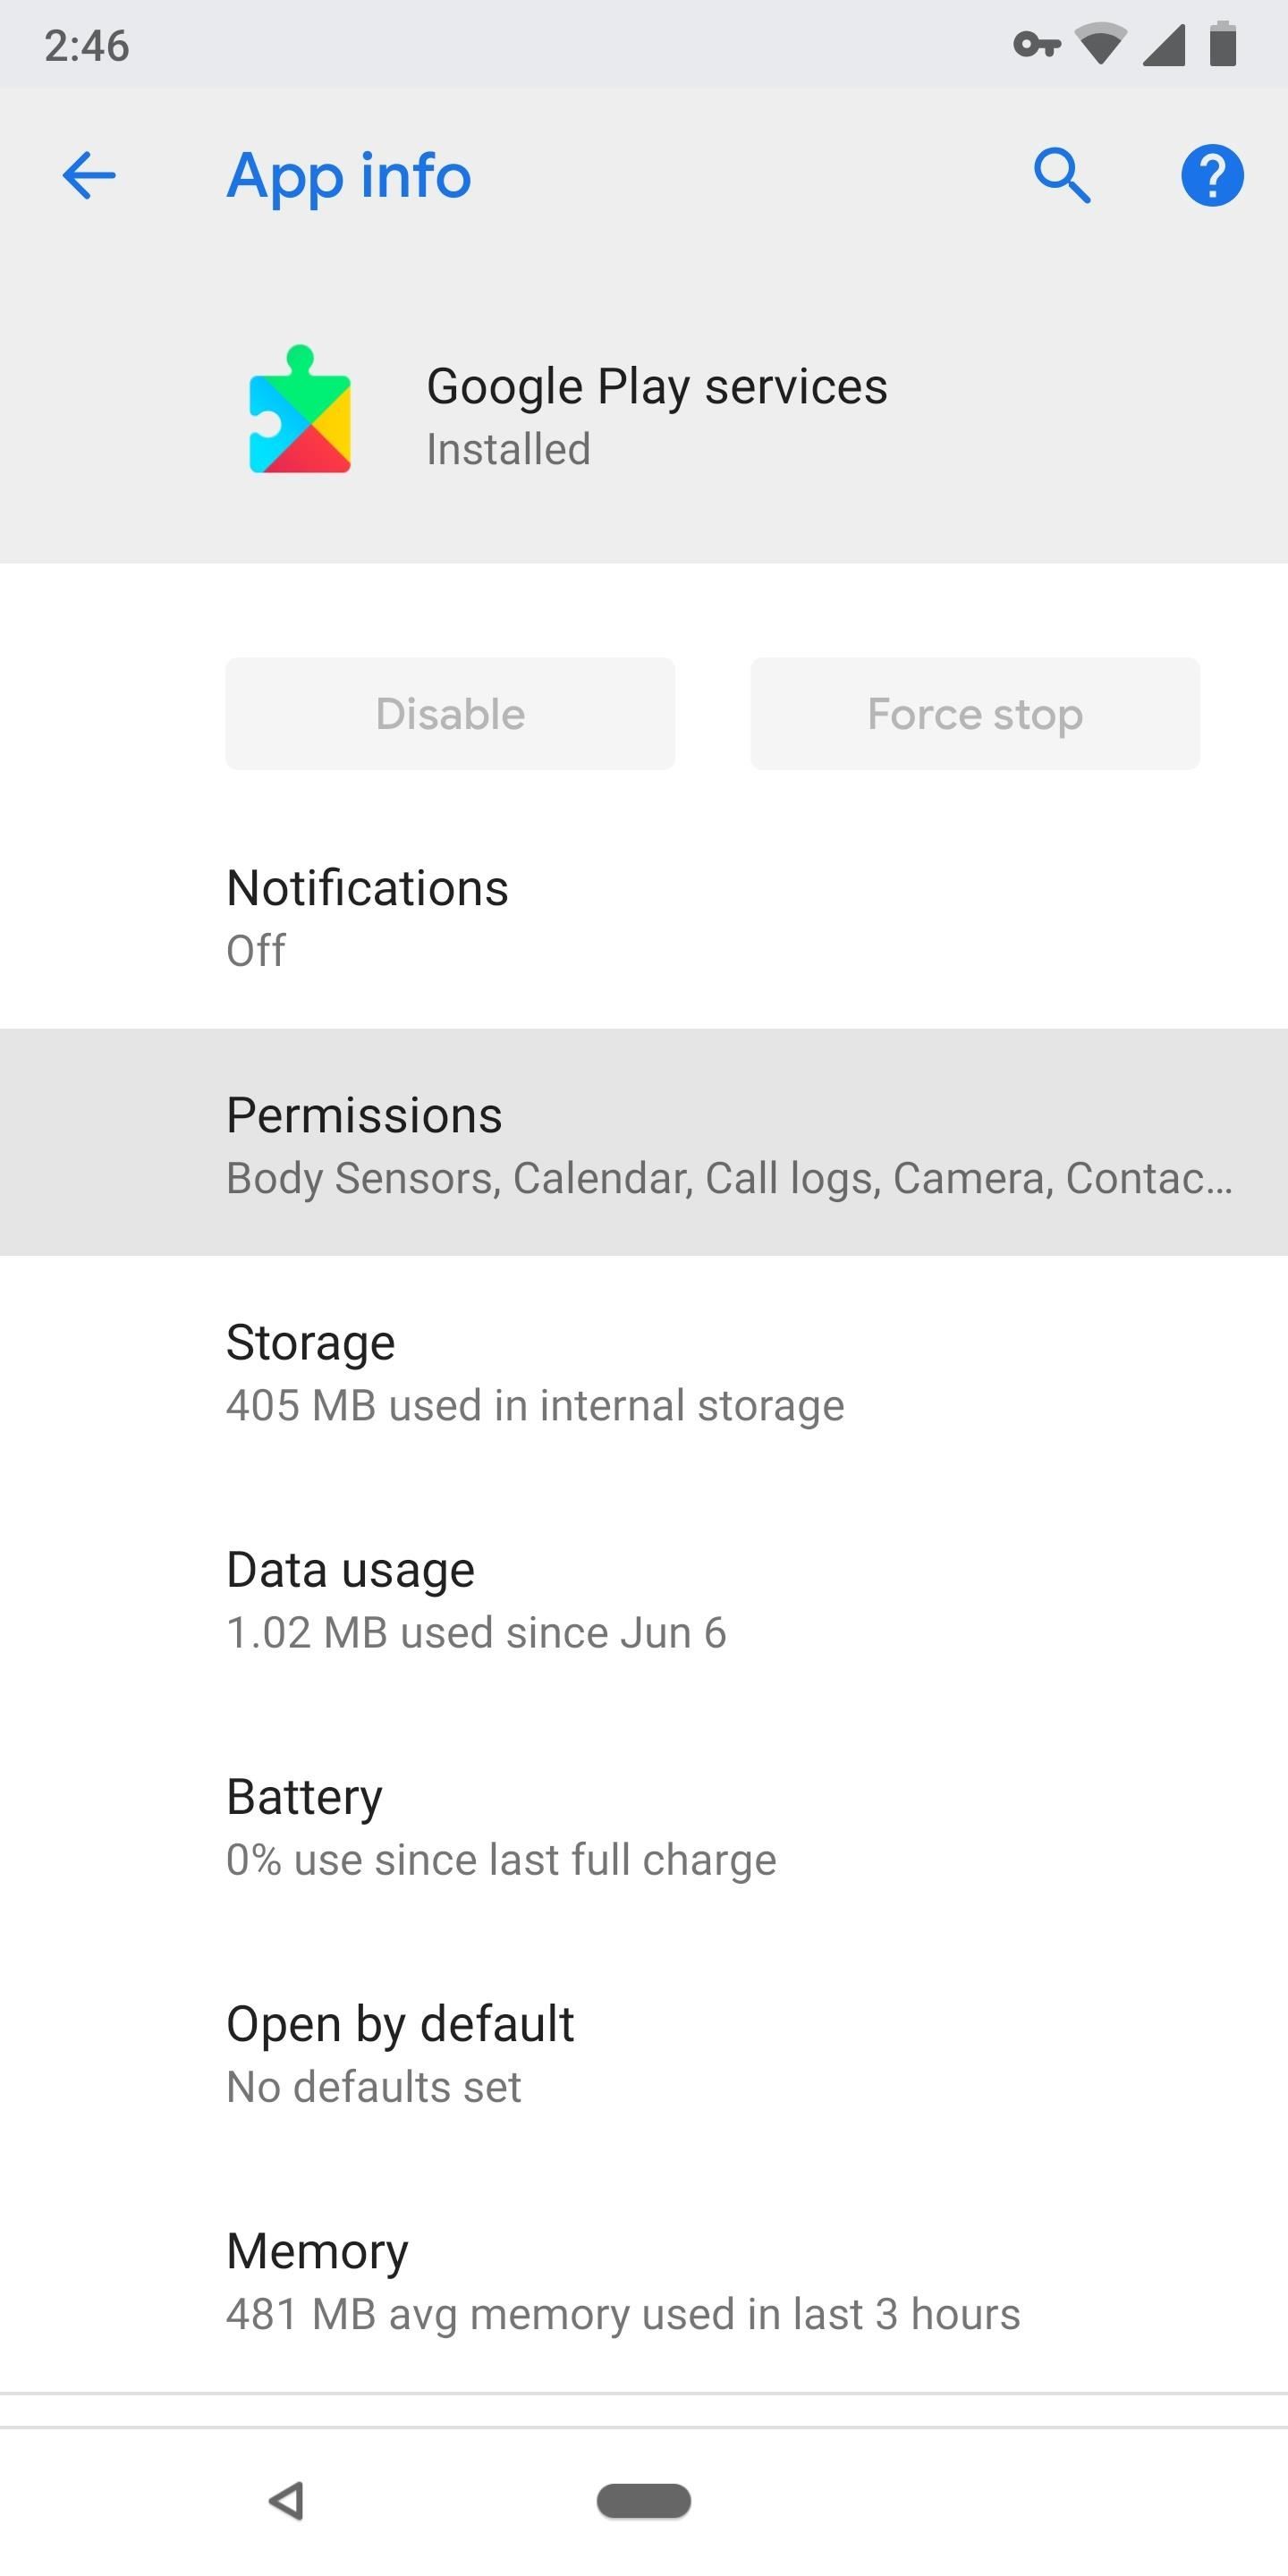
Step 5: Make Sure Play Services Has Location PermissionThe backbone of all Smart Lock features is a system app called Google Play Services. This app needs to be able to see your device's location in order for Trusted Places to work.To verify that Play Services can access your device's settings, head to Settings –> Apps, then select "All Apps" from the drop-down menu. Scroll down and choose "Google Play Services," then tap "Permissions" and make sure the "Location" toggle is enabled.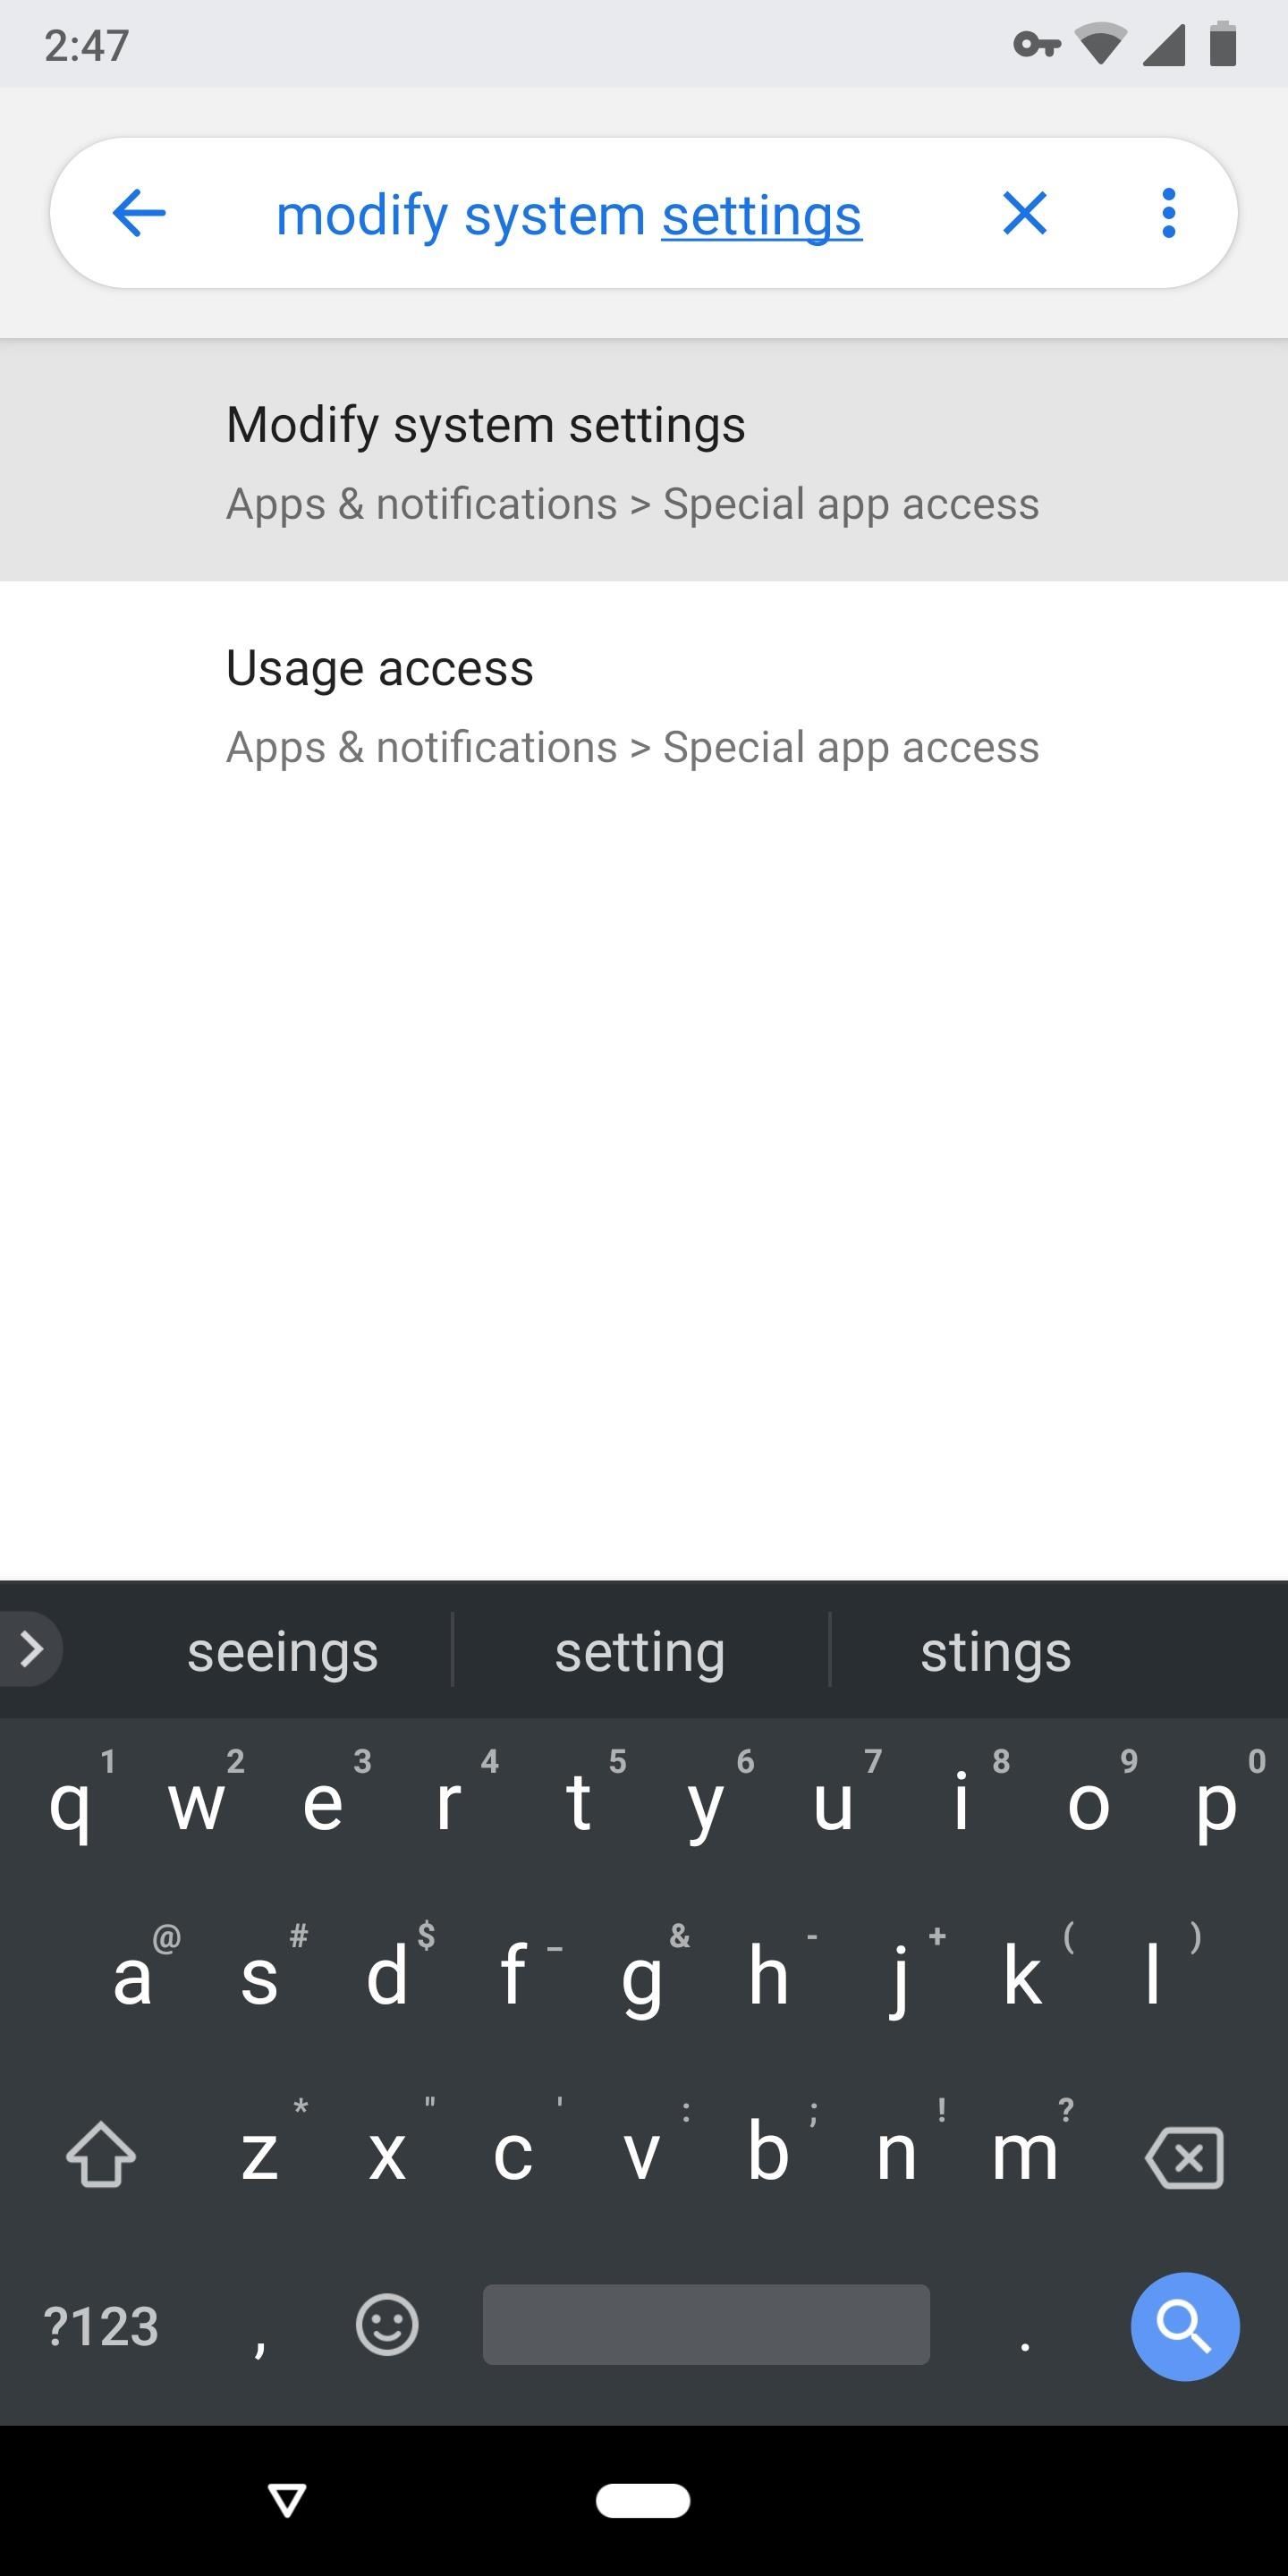
Step 6: Make Sure Play Services Can Modify System SettingsThe way Play Services can unlock your device when Smart Lock is enabled is by using a special permission called "Modify System Settings." Make sure Play Services has this permission by searching your Settings app for "Modify System Settings" and choosing the top result. From there, select Google Play Services from the list and make sure the toggle is enabled on the following screen.
Step 7: Make Sure Play Services Isn't Battery OptimizedThis next troubleshooting step won't apply to most users, but if you've used a mod like this one to dial back Play Services battery drain, Trusted Places may be failing because its backbone (Google Play Services) is in Doze Mode.To verify, head to Settings and search for "Battery Optimization" and tap the top result. From there, scroll through the list and look for Google Play Services — if it's listed on the main menu, you're all set. If it's not, tap the drop-down menu at the top of the screen and choose "All Apps," then find Play Services and set it to "Not Optimized."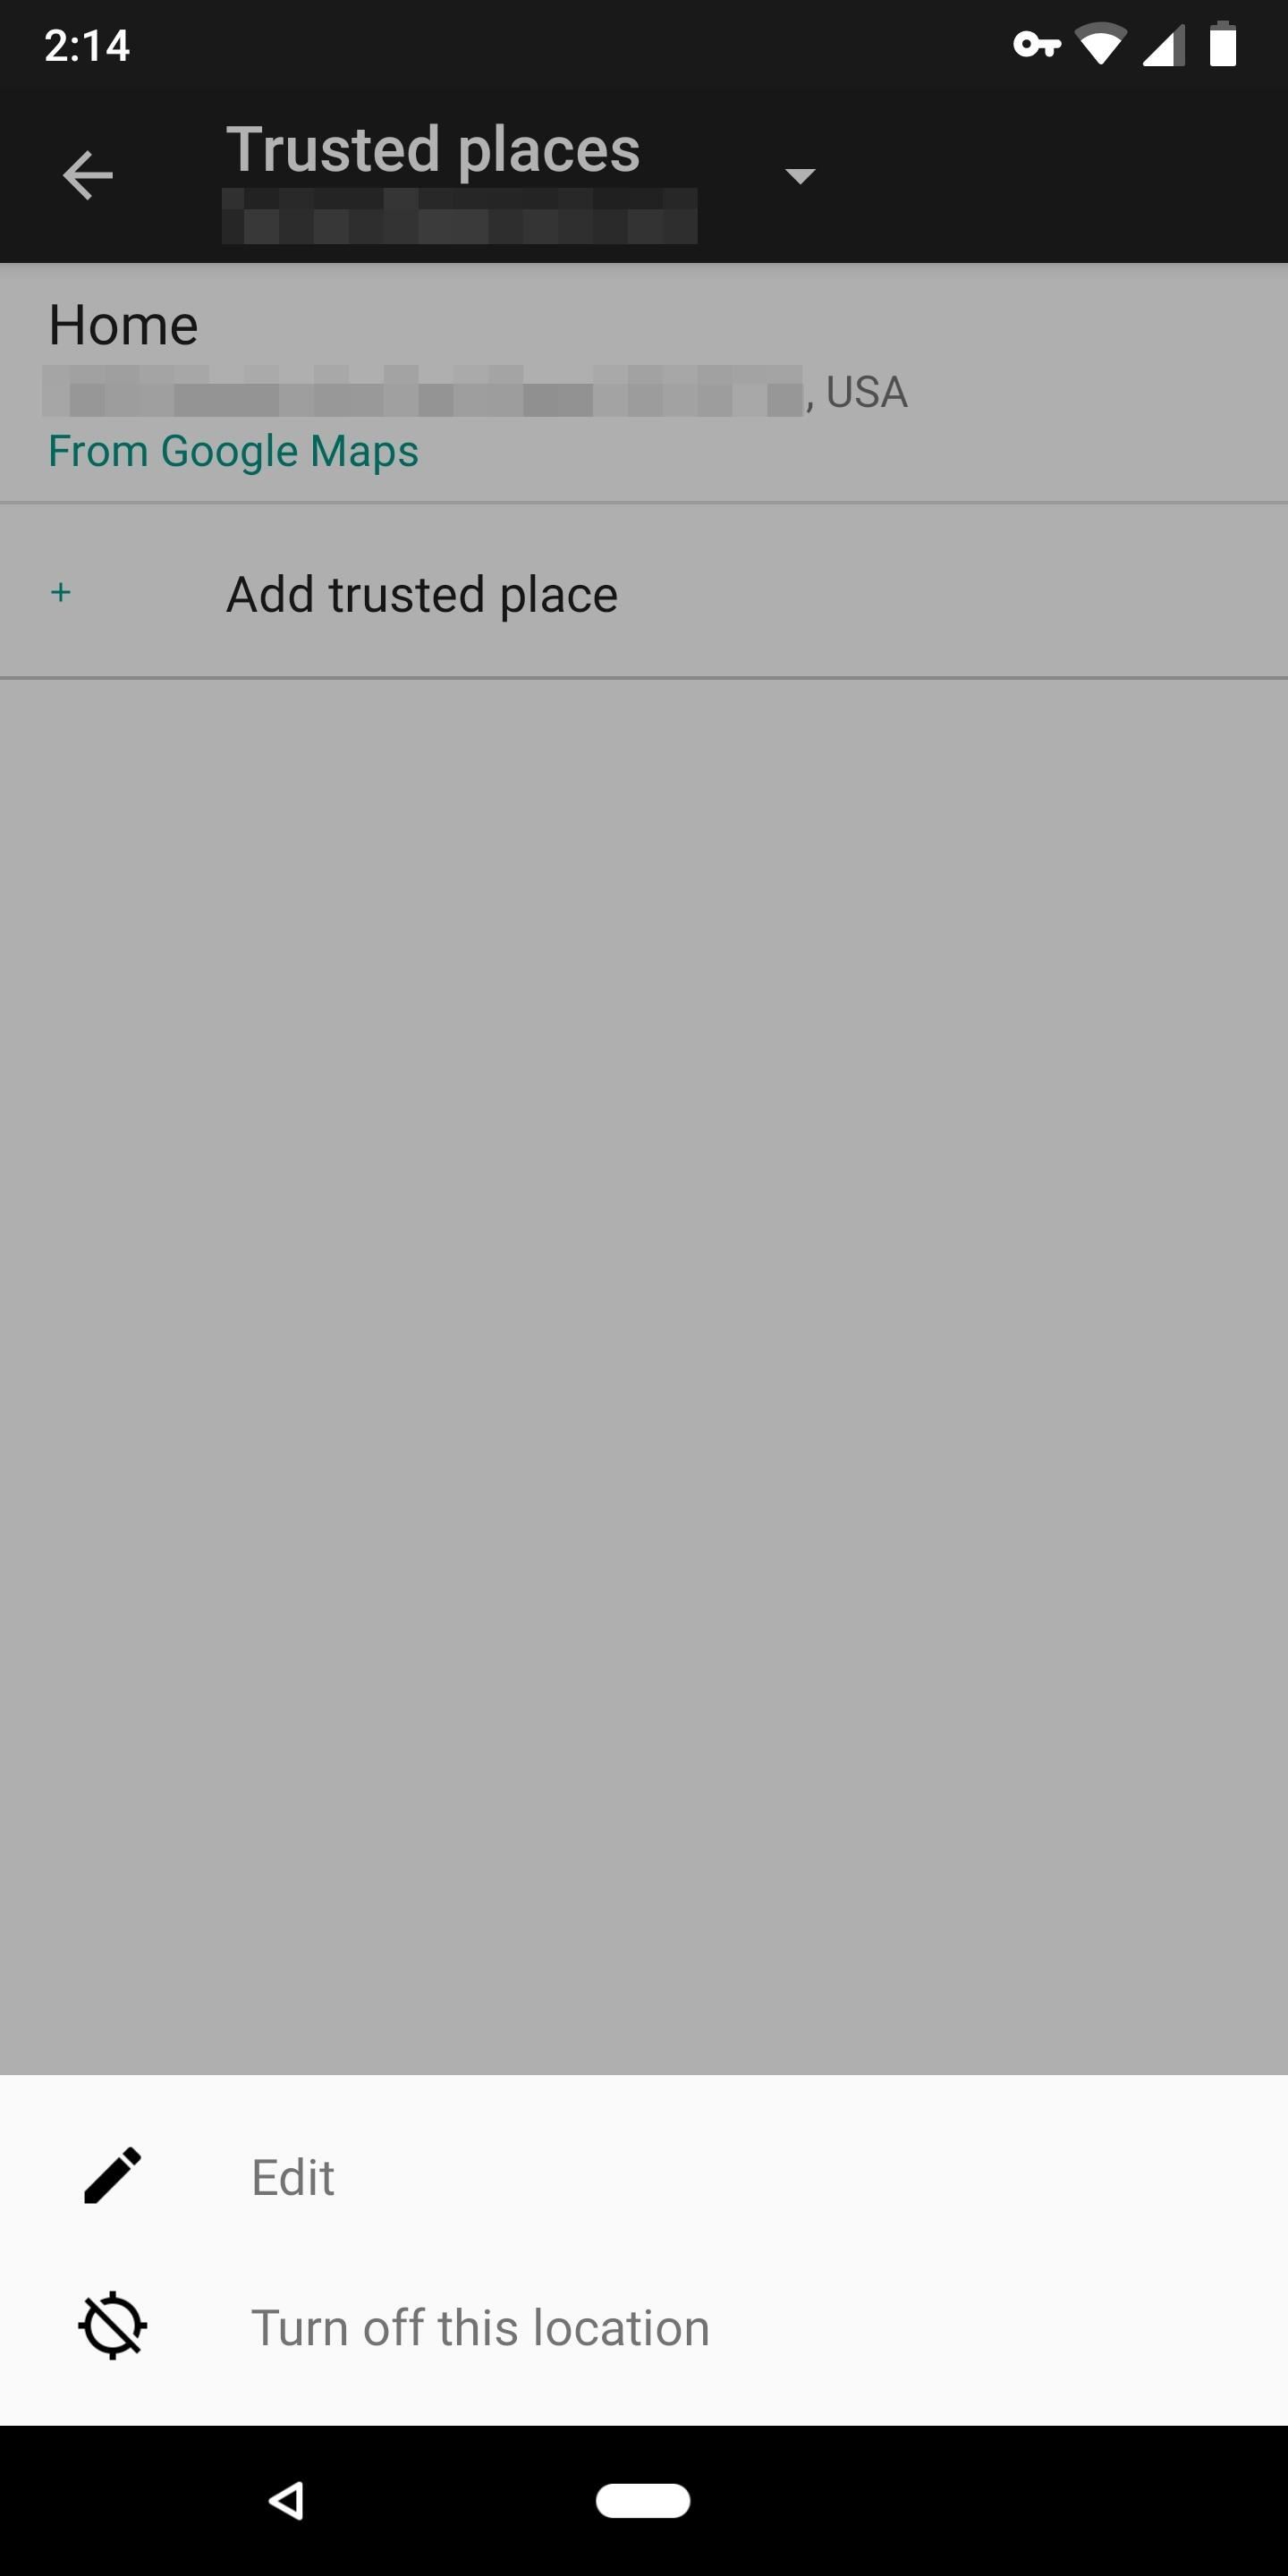
Step 8: Delete Trusted Place & Add It AgainHead to Settings –> Security –> Smart Lock –> Trusted Places, then tap the address you're having trouble with. From there, select "Edit" from the menu, then tap the trash can icon in the top-right corner of the next screen to remove this address. Confirm your choice on the prompt.When you're done there, restart your phone. When you get back up, head back to the Trusted Places menu and tap "Home," then enter the address again.
Step 9: Disable the Home Location & Add a Nearby AddressMost of us have let Google automatically determine our home and work addresses through Google Maps location data. If your trusted place is labeled as "Home" or "Work," this is where the address came from, and there's a chance that Google just has bad metadata for that specific address in its mapping system. As a workaround, head to Settings –> Security –> Smart Lock –> Trusted Places, then tap your default address and choose "Turn off this location."Next, tap "Add trusted place," then pan and zoom around the provided map until the location indicator is hovering over a spot very close to the address where you want Smart Lock to kick in. As long as your target address is within the blue dotted circle, Trusted Places will still work when you're there. Tap "Select this location" and then "Select" to make it a trusted place. Doing this manually will append coordinates to your trusted place, which is more reliable than just a street address.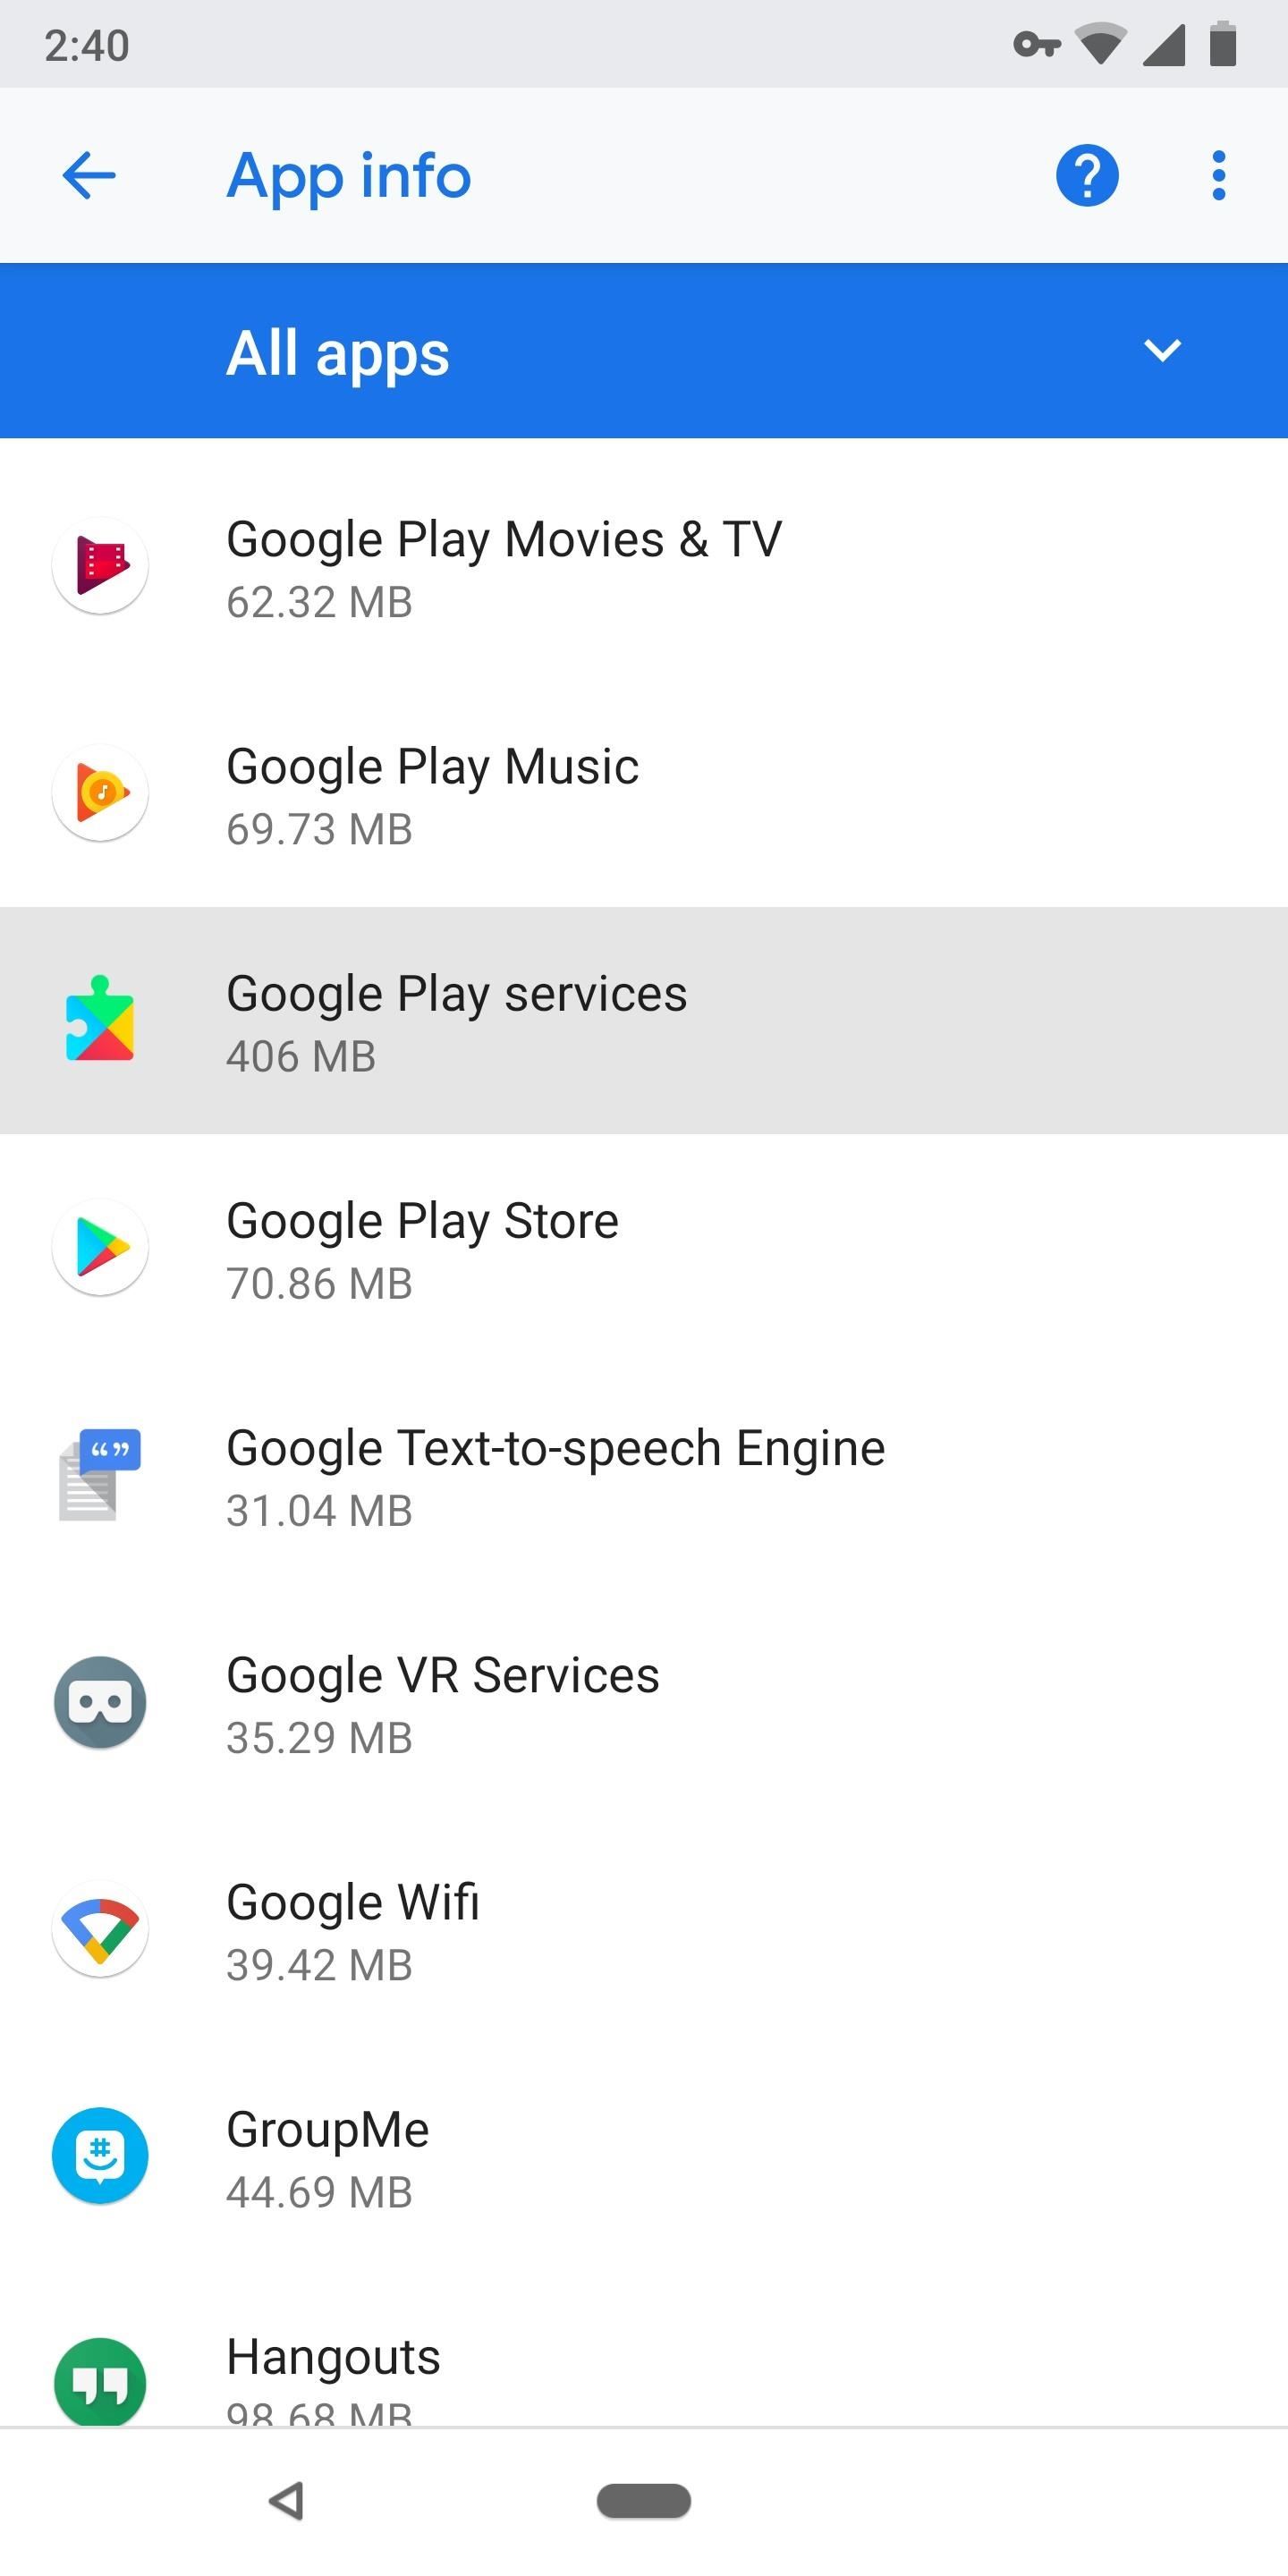
Step 10: Clear Data on Google Play ServicesThe last troubleshooting step is the nuclear option. Start by heading to Settings –> Security –> Smart Lock, then go through each menu item and disable all Smart Lock features. Make sure your Trusted Places are disabled as well.Next, head to Settings –> Apps. Select "All Apps" from the drop-down menu, then scroll through and find Google Play Services. Tap it, then choose "Storage." On the next screen, tap "Clear Storage" (or "Clear Data"), then confirm your choice on the prompt. As soon as you can, restart your phone. When you get back up, enable your Smart Lock features again and they should finally be working. If none of these troubleshooting tips worked for you, let me know in the comment section below. I want this guide to be as complete as possible, so I'll do my best to help you through any other potential troubleshooting steps we can find.Don't Miss: Google Photos Waiting for Wi-Fi? Here's the FixFollow Gadget Hacks on Facebook, Twitter, YouTube, and Flipboard Follow WonderHowTo on Facebook, Twitter, Pinterest, and Flipboard
Cover image and screenshots by Dallas Thomas/Gadget Hacks
The stock Android method of adding a Home screen page is to drag an icon left or right, just as if you were positioning that icon on another Home screen page. When a page to the left or right doesn't exist, the phone automatically adds a new, blank page. Other phones may be more specific in how pages are added.
Mastering the Android Home Screen | Smart Mobile Phone Solutions
With new iOS coming, Apple improves and increases iPhone capability to protect user data. To protect you and user data when online, Apple has added new features to Safari, its inbuilt browser. The iOS will not make the debut until next September 2018, however, these new features on Safari appeared on a beta version of iOS 12.
The best iOS 13 features for iPhone that Apple didn't tell
According to this support article, when you remove it from your iPhone, it removes it from a paired watch: If you have an Apple Watch paired with your iPhone, removing an app from your iPhone Home screen also removes that app from your Apple Watch Home screen. Remove built-in Apple apps from the Home screen on your iOS device with iOS 10
How to add, remove and rearrange apps in your Apple Watch Dock
This is why you bought a powerful laser. Using a simple desktop toy you can create an amazing light show. Enjoy.
How to make custom laser beam effects - pangolin.com
Learn how to hack Android video games—and how to play your favorites from retro home and portable gaming consoles, including Atari, Game Boy Advance, NES, N64, Nintendo DS, SNES, PSP, Sega
How to Play Your Favorite Game Boy Advance Games on - Nexus 7
Top 5 PDF Search Engine Sites to Get Free PDF eBooks 1. Ebook3000 Ebook3000 is a nice PDF search engine for PDF files (ebooks, documents & forms). And it is a library of free ebook downloads with over 17 categories available. You can also type in the keywords in the search box, then all the related PDF files are displayed here.
How to Find Thousands of Free Ebooks Online
Instead of all that juggling, when you plug your phone into your Windows PC, you'll be able to control every aspect of Android's UI with a dedicated window that mirrors your phone's display. It even accepts mouse and keyboard input, so now, your phone and computer will be more integrated than ever.
5 Best Methods To Mirror Android Screen to Your PC (No Root
There are a ton of really cool options there. Another way to get your rooted KitKat device to look like Android L is to just install the Android L Theme module for Xposed. You can find that on XDA
How to Get New Themes for Your Pixel on Android 10
Android 9 Pie update tracker: When will your phone get it? (Updated May 28) Google announced Android 9.0 Pie on August 6, 2018, and began rolling it out to Pixel phones the same day.
Hack a Cell on Sprint - Sprint iPhone 8 and iPhone X Owners
When you add a Gmail account to your iPhone or iPad, you'll have noticed that there's no delete option when you swipe from right to left on a message, only an Archive. This option moves the
Get Gmail to Stop Archiving and Start Deleting - nytimes.com
In this way, the EFS or IMEI loss is deeply related with what you do after rooting your Samsung Galaxy device. Keeping this thing in mind most of our ROM developers insert a script that automatically creates a backup of the EFS data on the external SD Card so that you might restore it back in case of loss or corruption.
How to Backup / Restore EFS Partition [IMEI] for Galaxy S3
Self Destructing Messages With ProtonMail, emails are no longer permanent. You can set an optional expiration time on ProtonMail's encrypted emails, so they will be automatically deleted from the recipient's inbox once they have expired.
Email How - Tips & Tricks
Easily Resize Images for the Web with This Drag & Drop
0 comments:
Post a Comment