How To: Install the Xposed Framework on Android Lollipop Devices
UPDATE 11/17/15The Xposed Framework now officially supports Android 5.1 through 5.1.1 Lollipop devices as well. Everything will still work the way it has with Android 5.0 through 5.0.2, but there are a separate set of files for the newer Android version. I'll cover both below, but make sure to download the proper file for your particular version of Android.END UPDATEOh Rovo89, you sly dog. The developer behind Android's most popular modding platform had us worried that the Xposed Framework might be nearing the end of development, but after a tease earlier this week, it has finally been made compatible with Android Lollipop.Installation is a bit different this time around (at least for now), but Xposed is definitely alive and kicking. This Lollipop-compatible build is in its earliest stages of development right now, so bugs are to be expected, but I'll show you how to install it below.
Note: if you haven't updated to Android 5.0 Lollipop yet, please see one of our other guides on installing the Xposed Framework for 4.4 KitKat and below.
RequirementsRooted device running Android 5.0 through 5.1.1 Custom recovery installed "Unknown sources" enabled Update: For the time being, do not install this on Samsung devices running TouchWiz (Samsung devices running AOSP-based ROMs should be fine).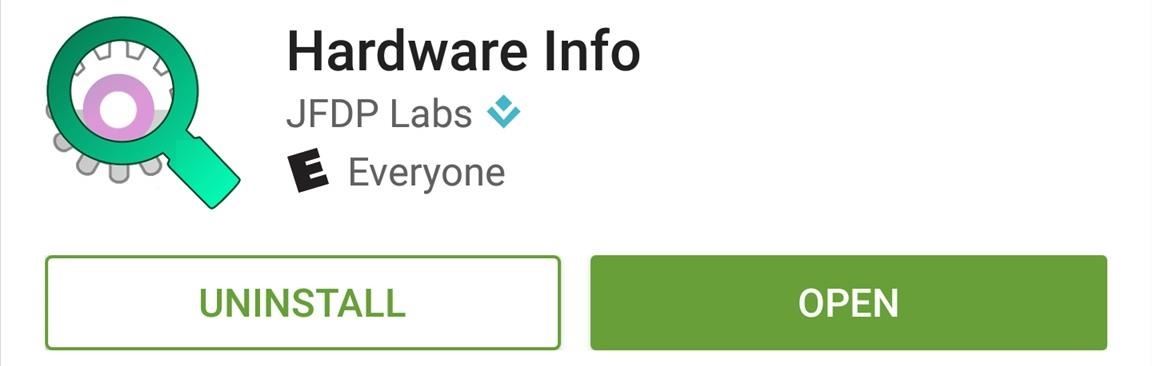
Step 1: Find Your Device's CPU Architecture & Android VersionThere are three different versions of the Xposed Framework for Lollipop devices, and each is designed for a specific CPU architecture. It can be fairly difficult to find your device's CPU architecture, so if you don't know this information off the top of your head, I'd suggest that you download a free app called Hardware Info. Once you've installed Hardware Info, simply open the app and tap the "Processor" entry. From here, look for one of three CPU architecture types—ARMv7, ARM64, or x86. The exact location of these CPU architecture names will vary, but you should see one of the three somewhere under the Processor category. (1) ARMv7, (2) ARM64 From there, head to the "About Phone" or "About Tablet" menu in Settings, then take note of your Android Version, as this will be used to determine the right files that you'll need to download.
Step 2: Download Necessary FilesThere are two core elements to Xposed—one is the Xposed Framework, which lays all of the groundwork, and the other is the Xposed Installer app, which allows you to download and manage modules. First up, grab a copy of the Installer from the following link, as this is the same for all devices:Xposed Installer APK Nowadays, the Framework will have to be flashed in custom recovery. There are 3 different version of the Framework for Android 5.0.X, and three more versions for Android 5.1.X. So first up, if your device is running Android 5.0 through Android 5.0.2, download the ZIP below that matches your CPU architecture type:Xposed Framework for 5.0.X devices (ARMv7) Xposed Framework for 5.0.X devices (ARM64) Xposed Framework for 5.0.X devices (x86) On the other hand, if your device is running Android 5.1 through Android 5.1.1, find the link below that matches your CPU architecture to download the proper Xposed Framework ZIP for your device:Xposed Framework for 5.1.X devices (ARMv7) Xposed Framework for 5.1.X devices (ARM64) Xposed Framework for 5.1.X devices (x86)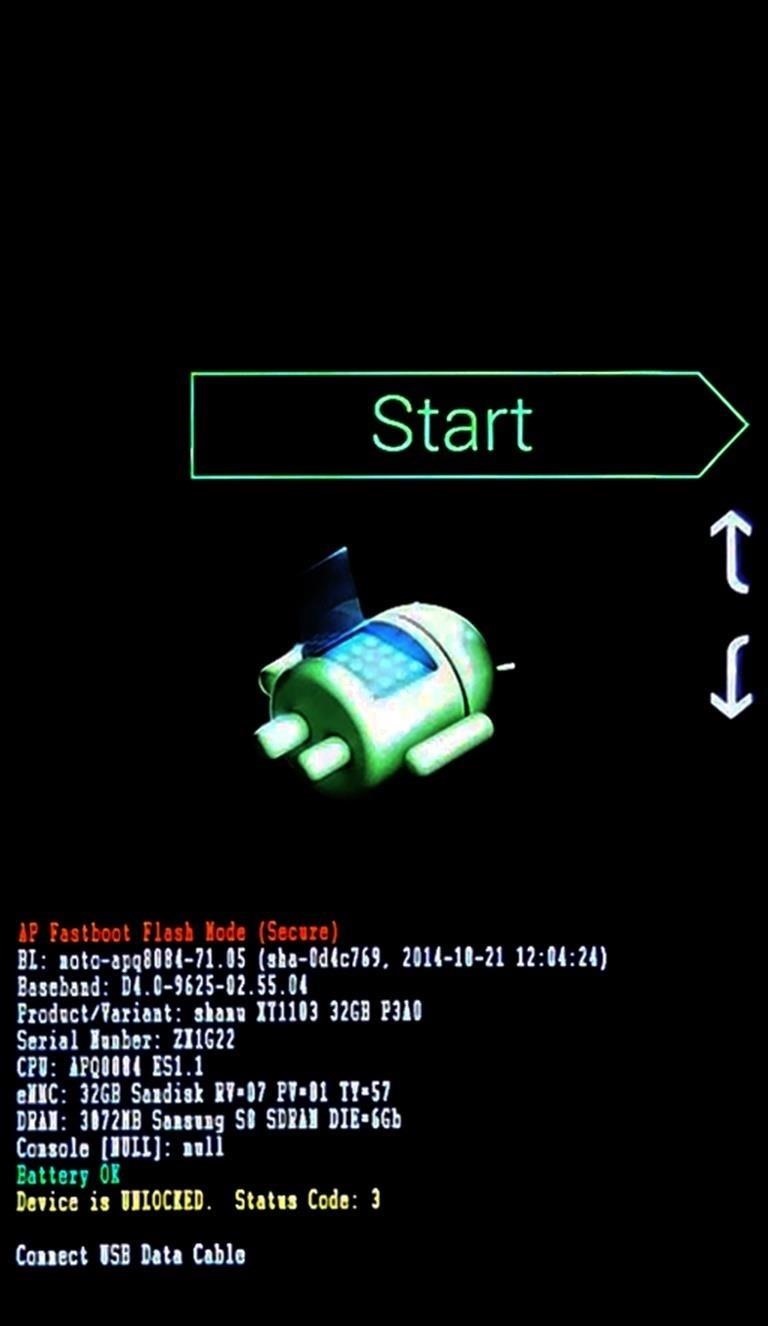
Step 3: Boot into Custom RecoveryWhen the files have finished downloading, the next step is to boot into custom recovery. To do that, start by powering your device completely off. This next part may vary, but for most devices, press and hold the volume down and power buttons simultaneously. This will bring up Android's Bootloader menu. From here, use the volume down button to highlight "Recovery mode," then press the power button to select it.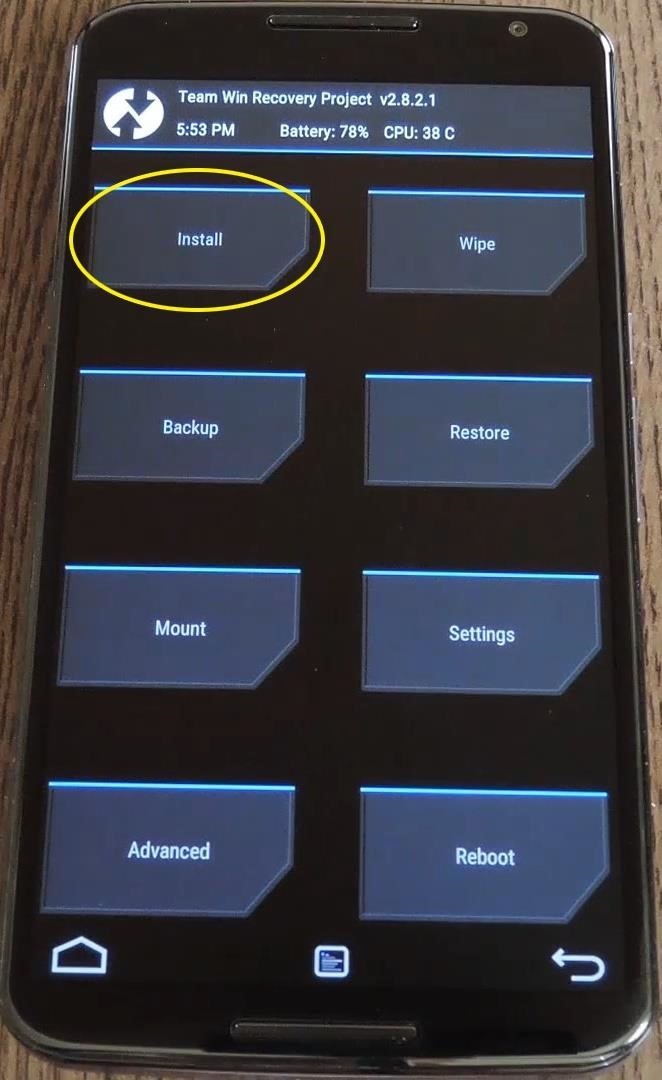
Step 4: Install the Framework in Custom RecoveryBefore you flash anything in custom recovery, it's always a good idea to make a full NANDroid backup. That's extra important in this case, since the Xposed Framework is in its early stages and may cause issues with some devices. Do not skip this step!Then, to get started, go ahead and tap the "Install" button from TWRP's main menu. Next, navigate to your device's Download folder, then select the Xposed ZIP file that you downloaded in Step 1. After that, just swipe the slider at the bottom of the screen to install the Framework, and when that's finished, tap "Reboot System." Your device will take longer than normal to boot up here. This is because the Xposed Framework ZIP had to clear away some library files, which will need to be restored. Expect this process to take at least 10 minutes.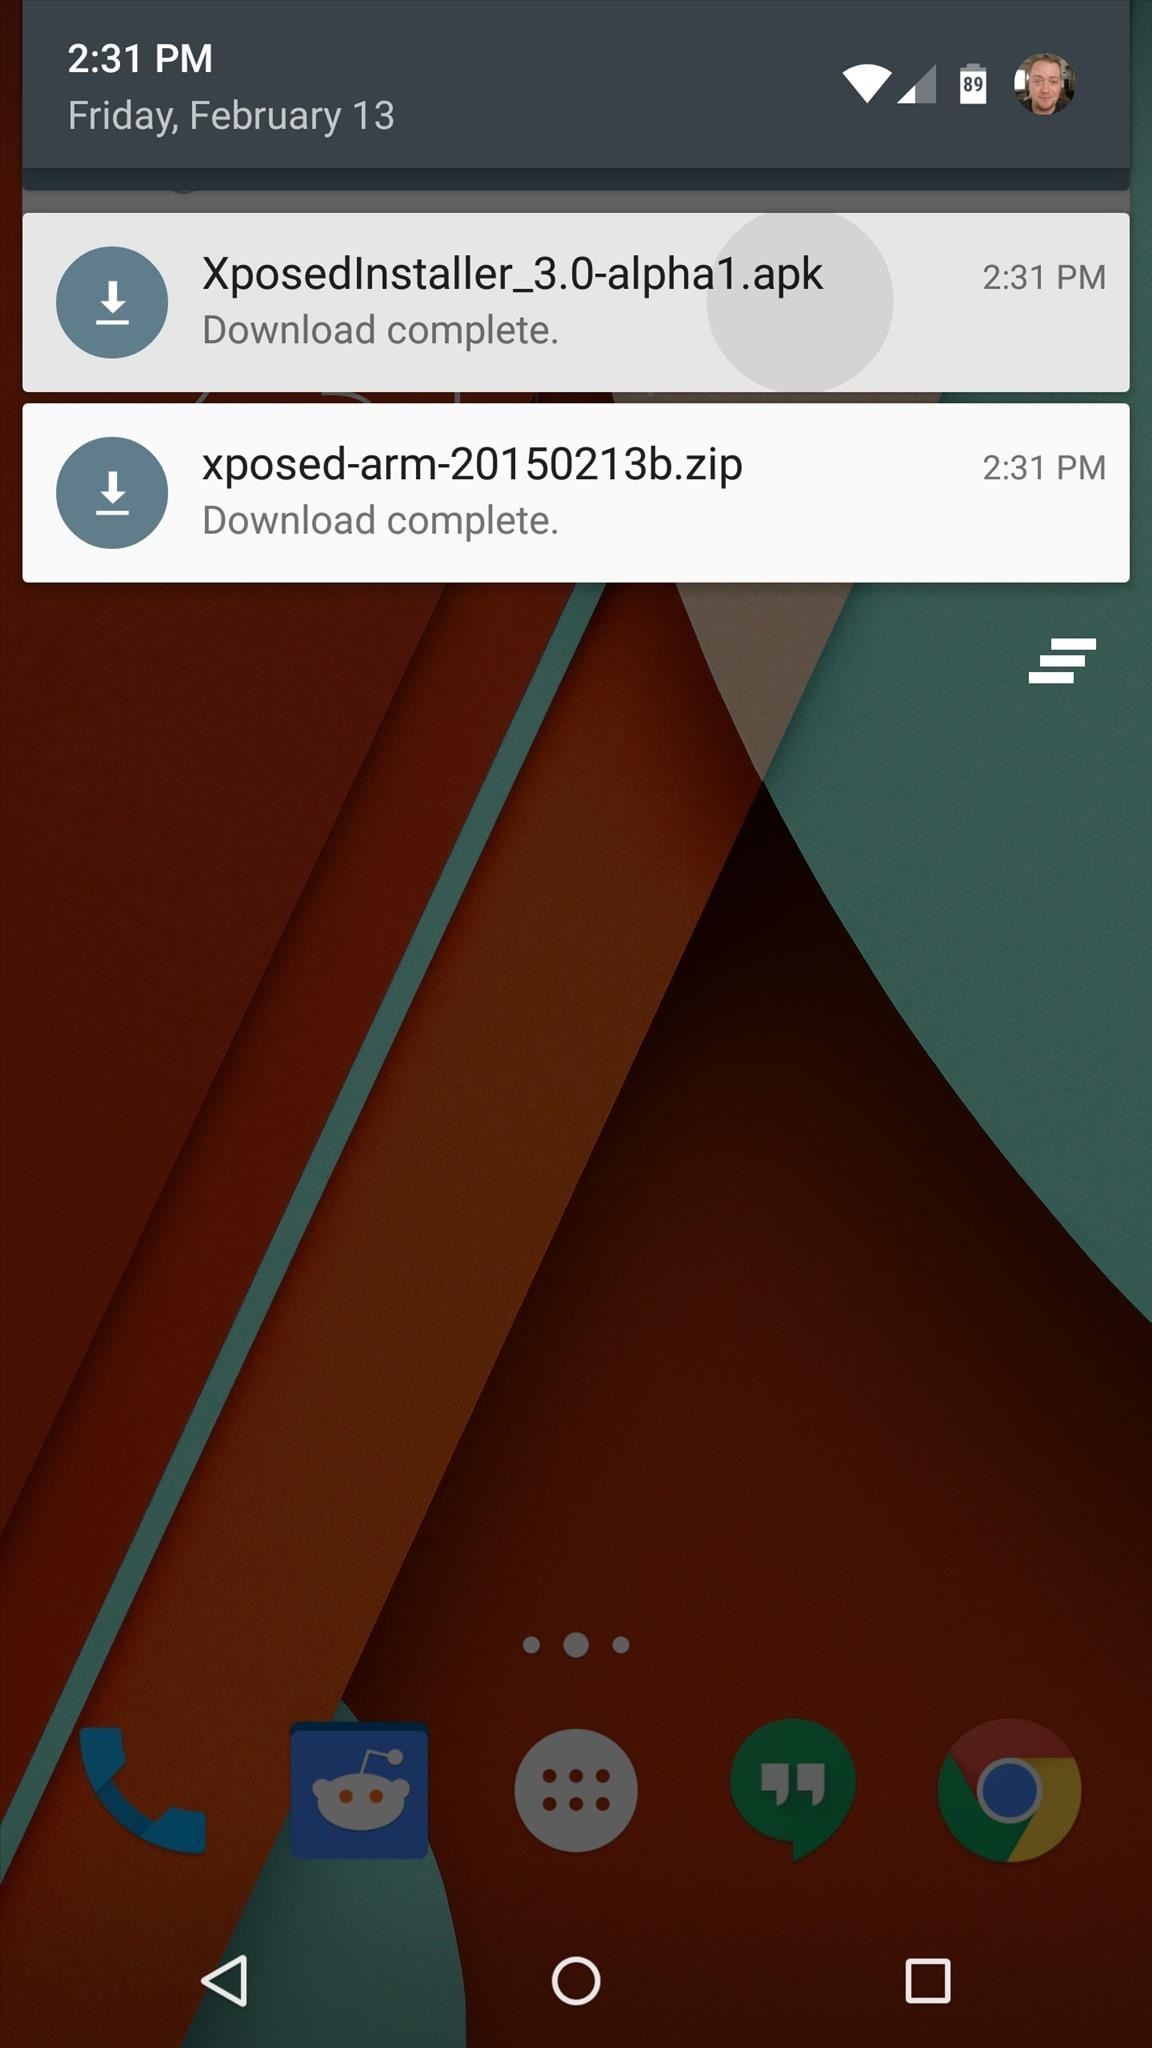
Step 5: Install the Xposed Installer AppWhen you get back up, it's time to install the actual Xposed Installer app. Tap the Download Complete notification for the "XposedInstaller_3.0-alpha4.apk" file, then press "Install" and "Open" on the next two menus. At this point, you should be looking at that familiar Xposed interface we all know and love. Head to the "Download" section to begin browsing modules, but keep in mind that some may not work on Lollipop. Mainly, any modules that deal with system modification are hit-and-miss, while those that deal with app customization are working for the most part. For a list of modules that are known to be working with Lollipop, check out this article.What were some of the first Xposed Modules that you installed on Lollipop? Let us know in the comments section below, or drop us a line on Facebook, Google+, or Twitter.
How to Change the Background on a Google Presentation. Google Presentation is one of the applications included in the Google Docs office suite that lets users create slideshow presentation online without downloading any software.
Change background color of single page in Google Document
Have you ever looked at your iPhone dock and wished you could place an extra, essential, or highly utilized app on there? Currently, with the basic settings you can only place four, but there's always that one that you wish could add to the mix. Head into the Cydia app, select the Search tab, look
How to Mod Your Old iPod 30-Pin Dock into a Bluetooth Speaker
I watched a lot of videos of how to do this sort of thing easily after I got the idea and tried it out myself with a single LED. Most of the videos seemed very hard for beginners and so, myself
How to make lights dance on Music | Sound sensitive LED's
iPhone screen replacement costs in the United States. The repair pricing in this chart applies only to screen damage. If you have any other damage to your iPhone, you'll pay additional costs. Not sure if you're covered? Check if you have AppleCare+ coverage by entering your iPhone serial number.
PDF iPhone 4 How-To Take Apart Repair Guide - RepairsUniverse
site.repairsuniverse.com/repair-guides-pdf/apple/iphone/iphone-4-how-to-repair-pdf.pdf
Your iPhone 4G is now disassembled and you can replace the damaged part(s) with new one. Reverse the instructions above to reassemble your phone. RepairsUniverse also has an iPhone 4S Video Repair Guide that will show the take apart and screen replacement process.
Here's How Apple Decides If You Deserve a Free iPhone Repair
News: Samsung's Amazing Music-Making Tool Soundcamp Is Coming to All Androids How To: Create drum sounds from scratch with Thor in Reason 5 How To: Route Reason's Kong drum designer as an external effect device How To: Use a Moeller stroke technique on the drums
Pre Settings for Guitar « GarageBand :: WonderHowTo
How To : Convert a ZIP archive into an IPSW file on a Microsoft Windows PC Turn a ZIP file into an Apple-compatible IPSW! This video will teach you everything you need to know to load custom firmware onto your iPhone, iPad or iPod Touch.
How to Change a ZIP file to a IPSW file - WonderHowTo
Now, tap on "Draw over other apps" or "Apps that can appear on top," then tap on any suspicious apps. Depending on your device, you may be taken to another page to access the app's permission toggle, or the toggle will already be present and located to the right of the app within the "Draw over other apps" page.
News: Apple Music Gets a Complete, More Intuitive Redesign in iOS 10 How To: Cycle Through All of Your iPhone's Wallpapers Automatically How To: Rate Songs with Stars in iOS 10's Music App How To: Browse your music in coverflow on an iPhone How To: Theme the iOS 7 Lock Screen on Your iPhone with Sleek, Rising Time Bars
Apple CarPlay redesign puts multiple apps side-by-side
The Night Sight mode in the Google Camera app for the Google Pixel 3, Pixel 2, and Pixel is incredible. The Google Nexus smartphones were beloved on XDA for their high-end specifications
Google's Night Sight is Blowing Minds: Shoot Photos in Near
How to View Your iPhone or iPod Touch Screen on Your Computer
Your Apple Watch can receive these alerts if your iPhone can receive them and is nearby, or your Apple Watch is on a Wi-Fi network. With a cellular plan from a supported carrier, your Apple Watch Series 3 (GPS + cellular) can receive these alerts without your iPhone nearby. For more information, contact your carrier.
Emergency: Alerts on the App Store - iTunes - Apple
Gmail has several features built-in that make it easier to get to your important emails fast, and thus, achieve inbox zero. After implementing these tips, Gmail will do a better job at filtering out trivial emails and notifying you only when it's important.
3 Tips to Get to Inbox Zero Faster in Gmail | The Efficient
This feature is not available right now. Please try again later.
How to change date and time format on Marshmallow? - Android
0 comments:
Post a Comment