How To: Your Complete Guide to Using Remote Desktop on the Microsoft Surface and Windows 8
Remote Desktop gives you access to your Windows 8 PC or device from wherever you are to run your applications and access your files remotely.Left an important document on your work computer? Want to run a legacy x86 desktop app from your Surface?You can use Remote Desktop to access that document or app from your laptop, tablet, or desktop instead of running back home or to the office. All you need to do is set up the connections and permissions to enable the devices you want to have access to and gain access from.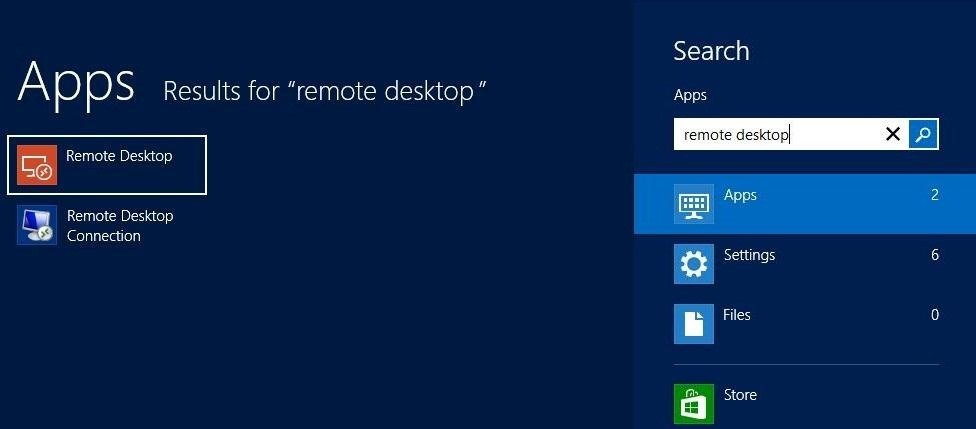
Launching Remote DesktopFrom the Start screen in Windows 8, you can simply type in "Remote Desktop" to access the program. If you don't already have it installed, you can download it from the Windows Store.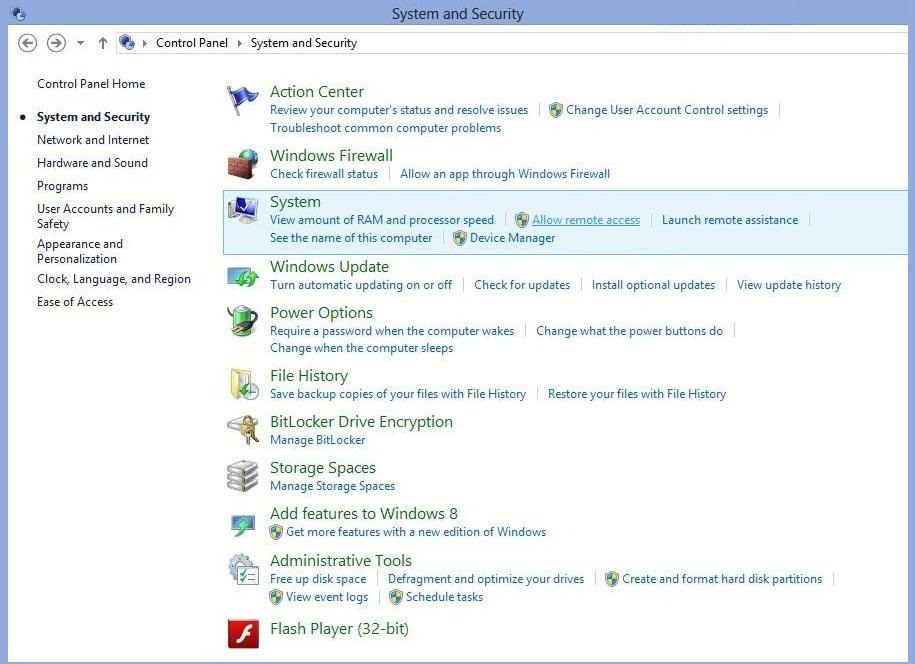
Enabling Remote Connections to Your Windows 8 MachineBefore you can remote desktop into your machine, you'll have to allow remote access on each of the machines you want to remote desktop into. You can do so from the desktop by going to Charms -> Settings -> Control Panel -> System and Security -> Allow Remote Access. Once Remote Access is open, you will need to select the radio button to Allow remote connections to this computer. This will make your computer start listening for remote desktop (RDP) connections on TCP port 3389. If you are going to be connecting to this machine from other Windows computers, tablets, phones, or other properly licensed Remote Desktop clients, then checking the second box, Allow connections only from computers running Remote Desktop with Network Level Authentication, is advised as it increases the security requirements for the connection. This allows only trusted Microsoft-friendly devices to access your computer.Here is what the Microsoft Support page has to say about Network Level Authentication (NLA):"Network Level Authentication (NLA) is a new authentication method that completes user authentication before you establish a full Remote Desktop connection and the logon screen appears. This is a more secure authentication method that can help protect the remote computer from hackers and malicious software."If you're trying to connect to your Windows 8 computer with a device that is not running a Windows OS, or are using a third-party remote desktop program that hasn't been properly licensed to use NLA, you will have to UNCHECK that box (just be warned, this is less secure).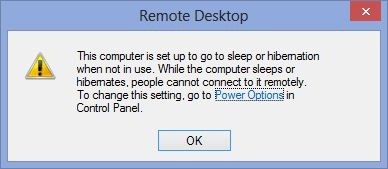
Power OptionsOnce you have chosen to allow remote connections and your computer is set up to go to sleep or hibernation when not in use, this prompt will pop up. As it states, if your computer is off, you of course cannot connect to it. So, if you are planning to remotely access your desktop, you will need to go to Power Options and disable sleep and/or hibernation for constant access. You can find these options under Advanced Settings. After you have taken care of that, your computer is ready for remote access.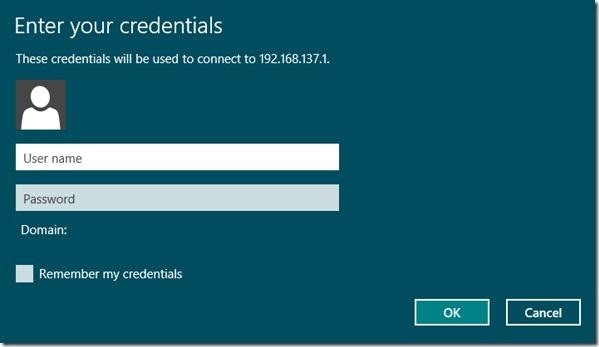
Connecting to PC from Your Microsoft Surface (Locally)You can easily control your Windows 8 computer's desktop using a Microsoft Surface. This will allow you to remotely run your legacy x86 desktop apps that cannot run on the ARM-powered Windows RT. For this connection, I remained on the same local network, which cuts out a few extra steps required to connect from a different network. All you need to know is the name and login information of the computer you want to remotely control.From your Surface, launch the Remote Desktop application. It will ask you for the name of the computer you wish to connect to. Here you can use the IP address, or the computer name of the PC you want to connect to (You can find the computer name of the PC you want to connect to by opening the file explorer on that PC and right-clicking on Computer, then clicking Properties). After clicking connect, you'll be prompted to enter your login information. This is the same username and password you use to log into your computer locally. Image via guidingtech.com Once that information is verified, you might see a pop-up warning about your security certificate. As long as you know the network you're connecting from is safe, you can ignore this warning and hit Connect. Wait for the connection to take over, and you should be good to go.Here's what it looks like on my Surface. Notice the blue bar at the top showing the name of the computer I am remotely controlling. It is not liquid-smooth connection, but definitely more than adequate for common tasks. Connecting via the same network is very smooth and user friendly on the Surface or any other local device. But when you want to connect from a different network, the process is a little more complicated.
Using Remote Desktop from Outside Your Home NetworkEnabling Remote Access was the easy part, now we have to make sure we can connect from outside our local network. To do this, we're going to need to forward a port on our router so our public IP address points at the private IP address of the PC we want to connect to. If that sounds forign to you, don't worry. We'll walk you through it.
Step 1: Find the IP Address of the PC You Want to Connect ToTo do this you can go to Control Panel -> Network -> Network and Sharing Center. You can also access the menu by right-clicking the computer icon at the toolbar on the desktop. From there, select Local Area Connections -> Details. Your connection details will pop up. You need to take down the IPv4 Address (highlighted below). This is your private IP address. Most private IPs will look something like 192.168.1.X, 192.168.0.X, 192.168.100.X, or 10.X.X.X.
Step 2: Login to Your RouterIf you want to access your computer remotely from a location outside of the local or home network, you need to set up the router to forward the remote requests from the computer you are using, to the private IP of PC you want to access (which you found in the previous step).To do this, you'll need to login to your router. Typically this can be done by replacing the last digit of your private IP address with a 1, and typing it in your web browser's address bar. For example, if your private IP address is 192.168.1.100, your router's IP address would be 192.168.1.1.If you do not know what your router address is, you can usually find it on the router itself or inside the instruction manual it came with. If you can't find it there, you can always contact your internet service provider and ask one of the technicians.When you have the router address, type it directly into the address bar in your browser and hit Enter. You should be prompted for a username and password to login to your router.If you don't know the password, check your router's manual. Typically the default username/password will either be admin/admin, admin/password, administrator/administrator, or it may even be blank (using the username admin).Type in your username and password to gain access to the configuration screen.
Step 3: Enable Port ForwardingOnce logged into your router, look through the menus. As every router is a little bit different, we can't give 100% exact instructions, but you should be able to find a section called Port Forwarding or Port Mapping. If you do not see it, try browsing to the advanced settings area first.Once there, you'll see options to forward port ranges of both TCP and UDP to a specific IP address. You'll want to add an entry that forwards TCP port 3389 (if prompted for 2 port numbers, just type 3389 in both fields) to the private IP address of your PC (which you found in step 1).This will ensure that Remote Desktop Connections going to your public IP address will be forwarded to your local PC.
Step 4: Find Your Public IP AddressNow you are almost ready to remotely connect. All you need to do is find your public IP address to use to connect to it from outside your network.From the PC you want to connect to, you can find out your public IP address by going to ipchicken.com or whatsmyip.org.Note: Several internet providers will give you dynamic IP addresses that might change every few days, or even every time you log in. To avoid having to find your public IP address every single time, you can enable dynamic DNS using one of the many providers, to assign a domain name that will always be up to date with your home connections public IP address.
Step 5: Remote Desktop into Your Home PC from Your SurfaceNow, from your Surface (or any other PC), outside of your local network, launch your remote desktop program. Type in the public IP address for your home PC that you found in Step 4. Click Connect, enter your login information, and you are all ready to go. Full access to your home PC from anywhere in the world!If you have any issues getting Remote Desktop set up, you can take a look at Microsoft's Support Page for answers from both Microsoft employees and the community. If someone else has already had the same issue solved, it could save you a bunch of time.
Rapidshare Search Shared Files | Megaupload Alternatives Servers
How To: Customize the Crap Out of Your Samsung Galaxy Note 2's Status Bar How To: This All-in-One Mods Catalog Makes Customizing the OnePlus One Extremely Convenient How To: Use Quick Actions to Toggle Settings Easily in Windows 10
Catalog of Astronomy Apps for Mobile Devices « Astronomy
Increasing Air Pump - How Awesome PVC Alcohol Gun Works More Powerful - DIY Video Description Watch how to make other airgun: Increasing Air Pump - How Awesome PVC Alcohol Gun Works More Powerful - DIY PVC airgun/ how to make a simple PVC pipe air guns can shoot all the rats and snakes [newcd] - YouTube See more
How to Make a Pen Gun: 7 Steps - instructables.com
So, that you can connect your HTC Desire S smartphone to the computer. 5.Finally, charge your HTC Desire S smartphone fully or atleast upto 75%. So, once you followed all the above mentioned instructions head over to the next path where I have given the detailed procedure to unroot HTC Desire S smartphone.
How To: Use the software and apps on an HTC Desire HD Google
By default, anything you download from a web browser will normally go to the Downloads folder on your computer. This is pretty much true regardless of the operating system you are running. Most people will use the default location for downloads, but there are instances where it might be helpful to change this folder.
How to change browser download settings for PDF files
Thanks to the advances in technology, never get out of touch with the internet. Most mobile phones, like the Palm Centro, have web-surfing capabilities. Watch this video cell phone tutorial and learn how to connect to the internet anytime, anywhere with a Palm Centro. Connect to the internet on a Palm Centro cell phone.
I am connected to the internet on my Palm Centro. How do I
NEW: Introducing AdaptiveZoom - an exclusive Action Launcher feature that zooms an adaptive icon to the center of the screen as the app loads! Note: AdaptiveZoom in beta, and requires adaptive icons (so you must be running either Oreo or AdaptivePack). NEW: 2018 Supporter badge is available!
How to Get iPhone 7 Plus (Portrait Mode) on iPhone 7, 6s, 6s Plus, 6, 6 Plus Bokeh FX Apps Bokeh Lens by StudioTIMO
This is not an official TWRP Recovery on Essential Phone PH-1 from TWRP Team. If you install any Custom Recovery on Essential Phone PH-1, you can install Custom ROM, Custom Mods, Custom Kernels or any zip file such as Xposed. Read the guide carefully on How to Root and Install TWRP Recovery on Essential Phone PH-1.
Root Essential Phone (PH-1), Install TWRP and Unlock Bootloader
Feeling Down? Get Back on the Right Track with 'What's Up
This is a complete tutorial on how to jailbreak any iPhone 3G 3GS iPod Touch iPad even if you are using the latest baseland 05.12.01 or 3.1.3 firmware. A jailbreak for iOS 4 devices is coming
How to Jailbreak iPhone iPod Touch 3.1.2 3.1.3 Firmware with
0 comments:
Post a Comment